CMGIT Network Equipment Installation Guide
CMGIT Network Equipment Installation Guide
The installation should be done as early as possible to complete the installation before the site opens.
- Some sites open at 10AM, most sites open by 10:45 am.
Notify the site manager or get permission to start the installation and notify them if the site's internet connection or if the POS's will go offline.
IMPORTANT: Ensure ATO is turned off.
Depending on what device you are installing, you will need to run some or all the following steps:
- Disconnect the device from its power source.
- Disconnect the cables to the device.
- Remove or unmount the old or damaged device.
- Mount the new device to its appropriate location.
- Reconnect the appropriate cables to their corresponding ports.
·
- Contact the Networking Team before swapping the CloudGenix to properly shut it down.
- Turn on the device.
·
- CloudGenix - Always use the new CloudGenix Power Brick.
- Reach out to the Network team for configuration and confirmation of functionality for the following devices:
- CloudGenix - Needs configured and functionality confirmed.
- Extreme Switch - Needs configured and functionality confirmed.
- Meraki WAP - Needs configured and functionality confirmed.
- CradlePoint (4g and 5g) - Needs functionality confirmed.
- Move any cables connections to their normal operating ports if applicable.
1.1 CradlePoint Location and Mounting
The CradlePoint will need to be mounted on a wall in the general vicinity of the office desk. Below are the following to consider.
a. Make sure the device is mounted so the cables and ports are easily accessible by a manager or a technician to avoid unintentional damage to the cables or equipment.
b. If the CradlePoint is a 4G CB850 and has the rabbit ear antennas, the antennas must be pointing up for the best reception as seen in item 1.
- If the CradlePoint is a 5G W1850 make sure the antennas are oriented, so the antennas are occupying two different plains as seen in the item 2 in figure below.
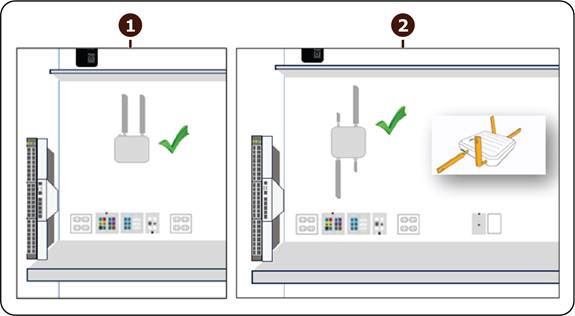
Figure 1: CradlePoint Location and Mounting
|
Item |
Description |
|
1 |
4G CB850 CP |
|
2 |
5G W1850 CP |
1.2. Switch and CloudGenix Location and Mounting
The network switch and CloudGenix should be mounted on the wall with the ports facing outward, easily accessible and easily visible. The managers and techs should be able to see the front ports have easy access to the front ports and rear ports and cables.
IMPORTANT: DO NOT mount the equipment with the ports facing up. If the ports face upward debris can easily fall into the ports and cause a short in one or more ports.
DO NOT mount the equipment so close to other devices, the techs and managers must be able to access the cables to replace them if necessary.
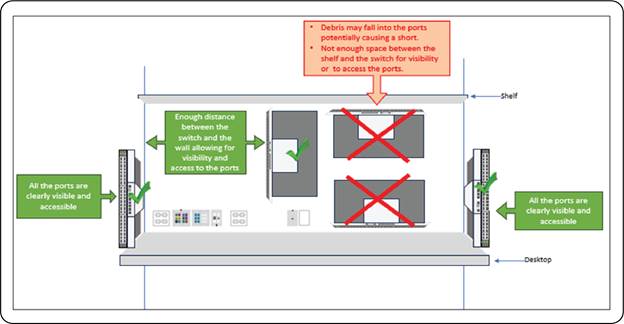
Figure 2: Switch and CloudGenix Location and Mounting
1.3. Power Options
Do not plug network equipment directly into a standard outlet without providing surge protection.
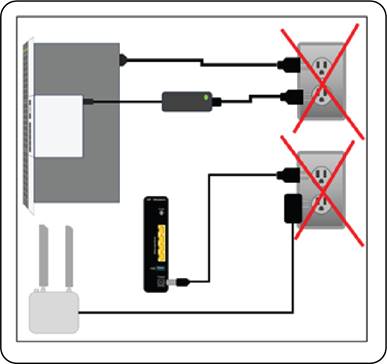
Figure 3: Do not plug without surge protection.
1.3.1 Power Option Minimum Requirement
a. If no BDP PANEL outlet is available, connect the network equipment, network switch, CloudGenix and CradlePoint to power using a power strip that provides surge protection.
b. If with redundancy, connect the network equipment, network switch, CloudGenix and CradlePoint to power using a power strip that provides surge protection to a BDP outlet marked in orange.
- Surge and battery protection via the BDP outlets marked in orange.
- Battery and surge protection using a UPS (universal power supply)
- Redundancy – in extreme cases you can use the UPS and the BDP outlets marked in orange.
|
Item |
Description |
|
1 |
Minimum requirement Item a |
|
2 |
Minimum requirement Item b |
|
3 |
Minimum requirement Item c |
|
4 |
Minimum requirement Item d |
|
5 |
Minimum requirement Item e |
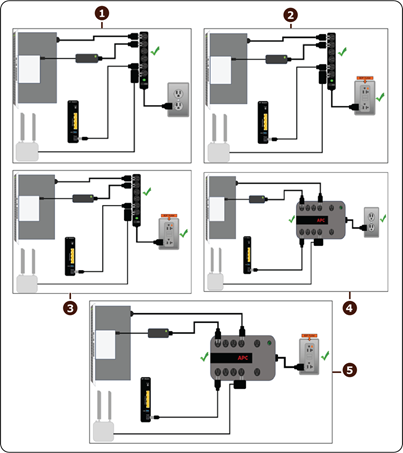
Figure 4: Power option minimum requirement
- Power - make sure it connects to a surge protected power source.
- ISP source - make sure the coa
 x cable is securely fastened to the coax port.
 - Ethernet ports - one of these ports will connect to port 1 of the CloudGenix.
Figure 5: Ethernet Port Available in ISP Modem
1.5. CradlePoint Connections
This applies to both the 4G CB850 and the 5G W1850 CradlePoint.
- Make sure the CradlePoint is connected to a power source with at least surge protection.
- Console port - connects to the console port on the switch.
- Lan 2 port - connects to port 2 of the CloudGenix.
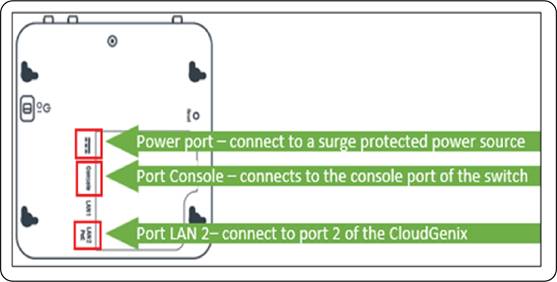
Figure 6: Port in CradlePoint
1.6. CloudGenix Connections
- Make sure the CloudGenix is connected to a power source with at least surge protection.
- USB ports- tape closed, nothing should connect to these ports.
- AUX port - not in use under normal conditions.
- Controller port - not in use under normal conditions.
- When sparing a CloudGenix, connect the console cable from the CradlePoint to the Controller port of the CloudGenix to configure the CloudGenix.
- Reach out to the network team with the device mac address and serial number to configure the device.
- After the CloudGenix has been configured disconnect the console cable from the Controller port and connect it to the Console port of the switch.

Figure 7: Cloudgenix Connection
1.7. Network Switch Connections
- Make sure the switch is connected to a power source with at least surge protection.
- Make sure the following ports are connected to the appropriate device:
- Console cable from CradlePoint
- Port 1 - BOH/ Fileserver
- Port 2 - FOH POS 1
- Port 3 - FOH POS 3
- Port 9 - DML POS 2
- Port 10 - DML KC 1/Tortilla
- Port 11 - DML KC 2/Salsa
- Port 12 - DML KC 3/Expo
- Port 13 - DML Bag Printer
- Port 27 – iPad charging port.
- Port 28 – iPad charging port.
- Port 30 - Kronos
- Port 31 - WAP 1
- Port 32 - WAP 2
- Port 35 - CCTV
- Port 36 – Music
- Port 37 - GridPoint
- Port 38 – Smart Safe
- Port 39 – Student card reader
- Port 40- Alarm
- Port 44 – Zenput Temp Sensor
- Port 47 – SIP Phone
- Port 48 – connects to port 5 of the CloudGenix
No comments to display
No comments to display